Integrating NextJS forms with Notion databases opens a world of possibilities for developers looking to streamline data collection. Whether it's for gathering customer feedback, building a mailing list, or any data-driven task, this seamless connection ensures efficiency and simplicity. In this blog post, I'll guide you through the process of submitting a NextJS form to a Notion database using HTML and JavaScript alongside Node.js.
With step-by-step instructions and example source code, you'll have everything you need to set up your own form submissions to Notion.
What You'll Learn
- How to set up a Notion integration for your workspace.
- Steps to create and configure your Notion database for storing form submissions.
- Connecting your integration with the Notion database.
- Crafting your HTML form and setting up the backend to handle submissions.
- Running example projects to see the process in action.
Setting Up Your Notion Integration
First, navigate to the Notion Integrations page and create a new integration for your workspace. Remember to securely store the Integration Secret token you receive, as this is pivotal for your backend service but must never be exposed in your frontend code.

Creating Your Notion Database
Next, you'll create a Notion database to store your form submissions. This database can have various properties based on your requirements, but for simplicity, let's start with just Name and Email. Ensure to note the database ID from the URL, as it will be used in your backend setup.

Connecting Integration to Your Database
It's crucial to connect your Notion integration with the newly created database. This process involves granting your integration access to the database through Notion's UI, ensuring that your backend service can insert data as needed.

Certainly! Let's dive into a practical NextJS example to enrich our guide on submitting a NextJS form to Notion. This example will illustrate how to create a simple contact form in a NextJS application that submits data directly to a Notion database. This includes setting up the environment, creating the form in NextJS, and handling form submission using NextJS API routes.
Using your integration in NextJS
After covering the basics of setting up your Notion integration, database, and a simple HTML form submission, let's focus on integrating with a NextJS application. NextJS, a React framework, provides an efficient way to build server-rendered React applications with ease.
Preparing Your NextJS Environment
- Create a New NextJS Project: If you haven't already, start by creating a new NextJS project by running the following command:
npx create-next-app@latest my-nextjs-notion-form
cd my-nextjs-notion-form
- Environment Variables: For securely storing your Notion database ID and integration secret, use environment variables. Create a
.env.localfile in the root of your NextJS project and add the following:
NOTION_DB_ID=your_notion_database_id
NOTION_SECRET=your_notion_integration_secret
Replace your_notion_database_id and your_notion_integration_secret with the actual values obtained when setting up your Notion integration and database.
Building the Form in NextJS
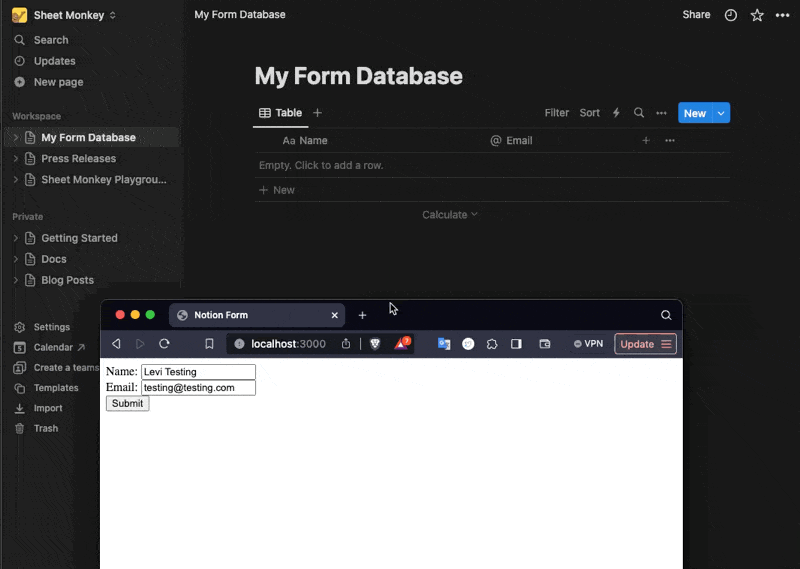
Create a new component for your form, e.g., components/ContactForm.js. This form will collect user inputs like name and email, similar to the HTML form example:
// components/ContactForm.js
export default function ContactForm() {
    async function handleSubmit(e) {
        e.preventDefault();
        const formData = {
            name: e.target.name.value,
            email: e.target.email.value,
        };

        // Post form data to our API route
        const response = await fetch('/api/submitToNotion', {
            method: 'POST',
            headers: {
                'Content-Type': 'application/json',
            },
            body: JSON.stringify(formData),
        });

        const data = await response.json();
        alert(data.message);
    }

    return (
        <form onSubmit={handleSubmit}>
            <label htmlFor="name">Name:</label>
            <input type="text" id="name" name="name" required />

            <label htmlFor="email">Email:</label>
            <input type="email" id="email" name="email" required />

            <button type="submit">Submit</button>
        </form>
    );
}
Handling Form Submission with API Routes
NextJS allows you to create API routes that can handle backend logic, such as submitting data to external services. Create a new file under pages/api/submitToNotion.js to handle the form submission:
// pages/api/submitToNotion.js
export default async function handler(req, res) {
    if (req.method !== 'POST') {
        return res.status(405).end(); // Method Not Allowed
    }

    try {
        const { name, email } = req.body;
        const notionDatabaseId = process.env.NOTION_DB_ID;
        const integrationToken = process.env.NOTION_SECRET;

        const response = await fetch("https://api.notion.com/v1/pages", {
            method: 'POST',
            headers: {
                'Authorization': `Bearer ${integrationToken}`,
                'Notion-Version': '2021-05-13',
                'Content-Type': 'application/json',
            },
            body: JSON.stringify({
                parent: { database_id: notionDatabaseId },
                properties: {
                    Name: {
                        title: [
                            {
                                text: {
                                    content: name,
                                },
                            },
                        ],
                    },
                    Email: {
                        email: email,
                    },
                },
            }),
        });

        if (!response.ok) {
            throw new Error(`Error: ${response.statusText}`);
        }

        const data = await response.json();
        return res.status(200).json({ message: 'Success! Entry added to Notion.', data });
    } catch (error) {
        return res.status(500).json({ error: error.message });
    }
}
This API route listens for POST requests and uses the Notion API to insert the submitted form data into your Notion database. It leverages the environment variables for the Notion database ID and secret.
Final Steps
With the form component and API route in place, you can now include the ContactForm component in your application, e.g., in pages/index.js, to render the form and allow users to submit data to your Notion database.
This example provides a basic framework for integrating a NextJS application with Notion, allowing you to capture and manage form submissions effectively. With these tools, you can expand your application's capabilities, leveraging Notion's powerful data management features.